Step 1 - Wrap teflon strip (PTFE) around thread
Hexagon Hotends tend to be leaky, when they are hot, if you don't take some precautions. So filament will drop outside from top of the thermal block. This happens due to different extension coefficients of the thermal block and the stainless steel thread.

Step 2 - Fit thermal block and filament tube together
Screw the filament tube into the thermal block.

Step 3 - Carefully tighten the connection
Tighten the connection between the filament tube and the thermal block. Be carefully not to overstress the thread!

Step 4 - Assemble heating cardridge
Assemble the heating cardridge into the designated hole of the thermal block and secure with set screw. It's a good idea to add some heat-conductive paste to the cartridge befor inserting into the hole. This will improve thermal flow.

Step 5 - Prepare NTC assembly
Add some heat-conductive paste into the hole for the NTC. This will insure a good thermal coupling between the thermal block and the NTC. You might alternativly glue the NTC into the hole, but you must use glue, which is able to withstand around 300°C (572°F).

Step 6 - Assemble NTC
Insert the NTC glas body into the designated hole.

Step 7 - Retighten connection on heated hotend
Connect the hotend to your printer controller and heat up the hotend to around 260°C (500°F). Then tighten the connection between the filament tube and the thermal block again with care.
Over then shown on the picture you should do this without the silicone rubber protection. The rubber protection is very sensitive and will get cracks when you hold it with a gripper.

Step 8 - Assemble the silicone rubber:
Pull the silicone rubber over the thermal block.

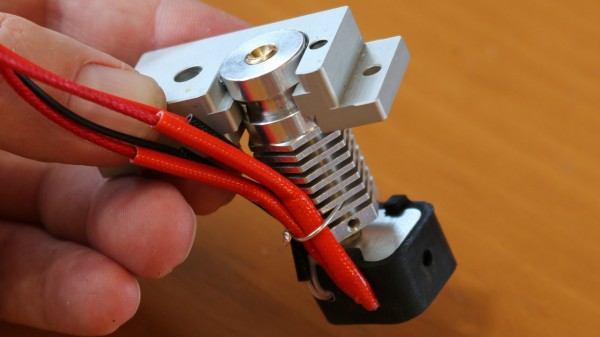
Step 9 - Secure electrical wires
To avoid unintendtional dissconnects of the wires, especially of the NTC, secure the wiring with a wire or something equal.
CAUTION:
If NTC looses contact the thermal block, the printer controller will heat up the temperatur until the thermal block will meld!
This will cause extreamly high danger of open fire!

Step 10 - Assemble the hotend with the holding plate
Fit the hotend into the holding plate of the colt end of the extruder.

Step 11 - Align coldend with hotend
Align the filament conductions between cold and hot end by adding a piece of filament through both. Then connect the holting plate to the filament gear.

Step 12 - Fit extruder to the printer
The last step will be to fit the assembled extruder to your printer and connect all wires.


